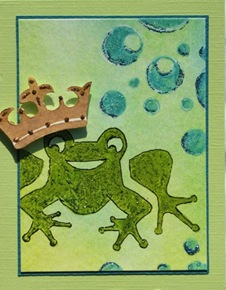
You'll find directions for this project and the ATC below on page 104 of the December 2011 issue of Crafts 'n things. Stamp sets are by Oxford Impressions (Sleigh Bells, Winter Snow, Season of Giving, and St. Nicholas.) Ranger® products also include Archival™ Ink, as well as Tim Holtz™ Adirondack® Alcohol Inks and Mixatives.
Showing posts with label Adirondack Alcohol Metallic Mixatives. Show all posts
December 29, 2011
ATCs - Beyond Trading: Vintage Memories
Christmas is a season when thoughts often turn nostalgic. Even if vintage Christmas images are not part of your memories, this classic box will provide a unique way to display ATC treasures. Grab your Tim Holtz™ Distress Inks, and in no time at all this sophisticated project will add to your Christmas decorations.

You'll find directions for this project and the ATC below on page 104 of the December 2011 issue of Crafts 'n things. Stamp sets are by Oxford Impressions (Sleigh Bells, Winter Snow, Season of Giving, and St. Nicholas.) Ranger® products also include Archival™ Ink, as well as Tim Holtz™ Adirondack® Alcohol Inks and Mixatives.
April 18, 2011
ATCs - Beyond Trading: Vintage Fairy Images
I didn’t notice when I purchased the trim that one set of beads in the middle of the section was not firmly attached. When I took the beads out of the plastic bag, the droplet fell apart. Sometimes the unexpected enables the imagination to take a giant step, and the broken beads provided that inspiration. Until then, I hadn’t realized that one of the small turquoise beads was actually a heart. The largest bead, why that could be a lantern for a little boy in search of fairies. One bead left, and I knew I would find the perfect spot for it atop a vintage ornament featuring stamps from the Oxford Impressions Fairy Sweets plate.

The ornament box and the ATC below feature Archival™ Ink, Adirondack® Dye and Pigment inks, and lots of Tim Holtz™ products: Distress Ink Pads, Alcohol Inks, Alcohol Ink Metallic Mixatives, and Alcohol Blending Solution. The instructions may be found on pages 84 and 85 of the April 2011 issue of Crafts 'n things®.
October 17, 2010
ATCs – Beyond Trading: Sweet Fairy Eyelet Ornament
When I first saw this image from Suzanne Melvin's Fairy Sweets plate (Oxford Impressions), I was fascinated. Her look is slightly impish, and I knew that she had to find a place on our already heavily decorated tree.
The ornament box is one that I created just for this project. You can find the pattern and instructions in the December 2010 issue of Crafts 'n things® at page 50. I used some of my favorite Ranger® products: Tim Holtz™ Adirondack® Alcohol Inks and Metallic Mixatives, Tim Holtz™ Distress Ink, Adirondack® Dye Ink, and Archival™ Ink. The crystal trim provides the perfect finish.
One little ornament might be lost on our tree. I think this little angel needs some friends!
The ornament box is one that I created just for this project. You can find the pattern and instructions in the December 2010 issue of Crafts 'n things® at page 50. I used some of my favorite Ranger® products: Tim Holtz™ Adirondack® Alcohol Inks and Metallic Mixatives, Tim Holtz™ Distress Ink, Adirondack® Dye Ink, and Archival™ Ink. The crystal trim provides the perfect finish.
One little ornament might be lost on our tree. I think this little angel needs some friends!
August 10, 2010
Recipe for Fashion Kitchen Set
The memory is rather faint: a day devoted to creating a Black Forest Cake from scratch only to discover that the husband who loves chocolate and lists cherry pie as a favorite did not like any combination of the two ingredients. The days when I enjoyed experimenting in the kitchen and envisioned neatly organized recipe files have long since passed. Instead, I just needed a place to file cards of different sizes, newspaper clipping, and the bits and pieces of recipes shared by friends over the years. With that in mind, I created this recipe box and coordinating grocery list and entertainment planner for the October 2010 issue of Crafts ‘n Things.
Grocery shopping is still an ordeal, but I smile each time I make my grocery list now. For detailed instructions, see page 74.
Stamps: Ornate Bird (Hero Arts®); Trumpet Vine and Forget Me Not Sprig (Memory Box); Large Gothic Lower Alphabet (Postmodern Design).
Inks: Tim Holtz™ Adirondack® Alcohol Inks and Metallic Mixative; Adirondack® Pigment Inks; Adirondack® Dye Ink. Also used, Inkssentials™ White Opaque Pen.
March 1, 2010
ATCs – Beyond Trading: Eggs-actly Perfect
The common plastic egg transformed into a unique marbleized encasement - all through the magic of Tim Holtz™ Adirondack® Alcohol Inks and Metallic Mixatives. Best yet, these eggs are the perfect size to display Easter ATCs.
The first egg features ATC Duckies by Red Lead Paperworks stamped with Archival™ Ink and colored with Adirondack® Dye Ink Pads and Tim Holtz™ Distress Ink Pads to add a vintage touch.
The second egg, another stamp by Red Lead Paperworks, ATC Hello Happy Easter, was stamped and colored in the same manner as the Duckies egg. In both cases, I've attached the trim with Inkssentials™ Glossy Accents™.
Of course, I wanted to create a card to accompany my eggs. I enjoyed creating this ATC with fantasy colors. The patterned paper is from the All Dressed Up Stack (DCWV).Certainly not your typical Easter colors!
See the April 2010 issue of Crafts 'n Things at pages 50-51 for further details of these projects.
The first egg features ATC Duckies by Red Lead Paperworks stamped with Archival™ Ink and colored with Adirondack® Dye Ink Pads and Tim Holtz™ Distress Ink Pads to add a vintage touch.
The second egg, another stamp by Red Lead Paperworks, ATC Hello Happy Easter, was stamped and colored in the same manner as the Duckies egg. In both cases, I've attached the trim with Inkssentials™ Glossy Accents™.
Of course, I wanted to create a card to accompany my eggs. I enjoyed creating this ATC with fantasy colors. The patterned paper is from the All Dressed Up Stack (DCWV).Certainly not your typical Easter colors!
See the April 2010 issue of Crafts 'n Things at pages 50-51 for further details of these projects.
March 15, 2009
Step Up Your Stamping with Foam Stamps
In the December 2008 issue of Crafts ‘n Things, I had two projects using foam stamps: the first, a tray in which a large stylized leaf and a circle stamp were turned into vibrant poinsettias, and the second, a set of holiday cards. In the April 2009 issue, you’ll find four more cards that prove that foam stamps can be sophisticated or just plain fun.
Once again, I’ve used some of my favorite supplies – Adirondack® Acrylic Paint Dabbers (and Adirondack® Metallics Acrylic Paint Dabbers,) Adirondack® Dye Ink Pads, Perfect Pearls™, and Stickles™ Glitter Glue. The foam stamp transformation is made complete with an Inkssentials™ White Opaque Pen and a black pen (Pitt Artist.) For more information on how to “Step Up Your Stamping with Foam Stamps,” check out my article on pages 78 – 79, and you too will join the glitz, glitter craze!
October 5, 2008
A Matter of Imagination
The tray had been a fixture on our porch for years, and the once rich finish showed the effects of constant exposure to the elements. When Crafts 'n Things editor Dawn Gehring suggested a Christmas home decor project, I knew this was the perfect project to repurpose a favorite piece. You'll have to check the December 2008 issue to see the tray itself, but a few swipes of Espresso paint with an Adirondack® Acrylic Paint Dabber gave the tray new life.
I envisioned big, bold flowers and leaves. Since the poinsettia stamps that I had on hand were not the size that I wanted, I turned to large foam leaf and circle stamps to create the images that I envisioned. As with the foam stamp Christmas cards, I used Adirondack® Acrylic Paint Dabbers and Adirondack® Metallic Acrylic Paint Dabbers to mix my paints right on the stamps. I believe I achieved the bold look that I had in mind!
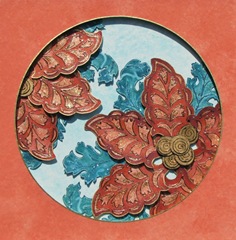
Now for a closer look. When I think of Christmas, I think of glitter and glitz, and the fun part of the project was adding those details. Adirondack® Dimensional Pearls, Stickles™ Glitter Glue, and Perfect Pearls™ pack a glamour punch and the Inkssentials™ White Opaque Pen adds subtle accents.
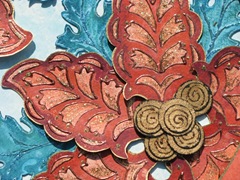
As for the glass charms, Tim Holtz™ Adirondack® Alcohol Inks and Metallic Mixatives quickly transformed jewelry findings into coordinating pieces. Rather sophisticated if I do say so.
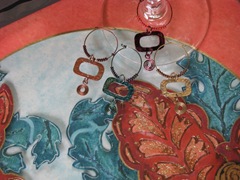
For additional details, see pages 52-53 in the December 2008 issue of Crafts 'n Things.
I envisioned big, bold flowers and leaves. Since the poinsettia stamps that I had on hand were not the size that I wanted, I turned to large foam leaf and circle stamps to create the images that I envisioned. As with the foam stamp Christmas cards, I used Adirondack® Acrylic Paint Dabbers and Adirondack® Metallic Acrylic Paint Dabbers to mix my paints right on the stamps. I believe I achieved the bold look that I had in mind!
Now for a closer look. When I think of Christmas, I think of glitter and glitz, and the fun part of the project was adding those details. Adirondack® Dimensional Pearls, Stickles™ Glitter Glue, and Perfect Pearls™ pack a glamour punch and the Inkssentials™ White Opaque Pen adds subtle accents.
As for the glass charms, Tim Holtz™ Adirondack® Alcohol Inks and Metallic Mixatives quickly transformed jewelry findings into coordinating pieces. Rather sophisticated if I do say so.
For additional details, see pages 52-53 in the December 2008 issue of Crafts 'n Things.
May 18, 2008
Storing Your ATCs with Glitz and Sparkle
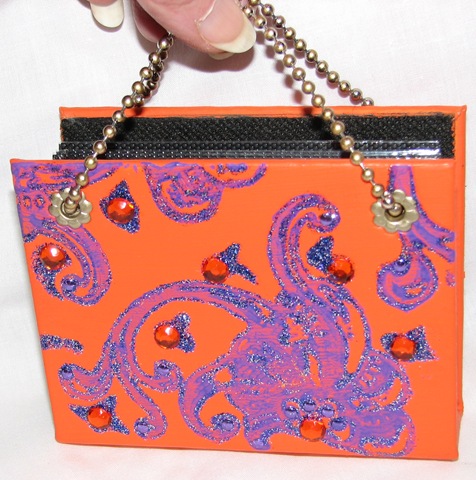
I'm afraid that my photo doesn't adequately show the details of this ATC holder. (That's my hand in the picture, and I couldn't hold the chain and get the right angle to spotlight the glitz at the same time.) When I finished this project, my evaluation was "gaudy cute." You'll find a better picture on page 65 in the April 2008 issue of Crafts 'n Things.
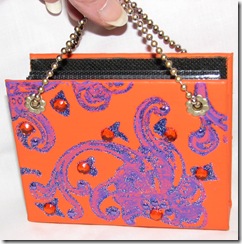
After purchasing a mini album from the dollar bin at the craft store, I realized it was the perfect size for ATC storage. All it took was Adirondack Acrylic Paint Dabbers, Swirly Element by Postmodern Design, Stickles Glitter Glue, and jewels for added bling. By adding the hibiscus eyelets and ball chain that I colored to match with Adirondack Alcohol Metallic Gold Mixative, the mini album was transformed into a little purse, the perfect size for transporting ATCs. Check out the details to make your own "gaudy cute" holder in Crafts 'n Things.
March 30, 2008
Stamped "Purse" Gift Bag
This project was published in the May 2007 Rubber Stamper as a variation of the "snazzy" found background technique. First I stamped all flowers and paisleys (Hero Arts) onto text weight paper. Next, I pounced ink over punchinella ribbon extending the ink past the edges of the ribbon to create a creased effect. Finally, I stamped my initials with LaPluma's Exiled alphabet for a personalized touch. In just a few easy steps, you can turn an inexpensive gift bag turned into a designer purse!
Subscribe to:
Posts (Atom)