Showing posts with label Adirondack Acrylic Paint Dabbers. Show all posts

January 10, 2011

ATCs - Beyond Trading: Steampunk Valentines

Recycling has a much nicer sound than dumpster diving. At least that’s what I claimed when I rescued this heart shaped box on the way to the landfill for the project on page 48 of the February 2011 issue of Crafts 'n things®. What better reuse than turning a box that once held chocolates into a repository for these non-traditional Valentine ATCs.
2011 02 LRoberts ATCs Beyond Trading Steampunk Valentine Heart Display Box
The box and the ATC below were designed with Ranger® products: Claudine Hellmuth Studio Gesso; Archival™ Ink; Adirondack® Dye Ink Pads; Tim Holtz™ Adirondack® Alcohol Inks; Inkssentials™ Glossy Accents™; Adirondack® Acrylic Paint Dabbers.
2011 02 LRoberts ATCs Beyond Trading Steampunk Valentine Eye for You ATC
If you are unfamiliar with the genre, steampunk provides a perfect opportunity to exercise your creativity. When I created this project, Suzanne Melvin of Oxford Impressions had one steampunk plate, Steampunk Elements. (Other plates used in these projects were The Dressmaker, Bonbon, My Story, and Fairy Sweets.) Now, Suzanne has two more exciting steampunk plates, Steampunk Works and The Deep. Two times the ways to create non-traditional Valentines!

Exploring Image Transfers: Tape Transformation

Do you remember the first time that you saw heat embossing? It’s still a moment of wonder for me. I had a similar experience years ago when I first watched a demonstration of packing tape transfers. Now, when I share this technique, the reaction is always the same. People can’t believe that the process is so simple. I have to agree.
These projects are the first in a series of three articles on image transfers for Crafts 'n things®. First, a card featuring a stamp by Impression Obsession, Inc. , Hopes & Dreams. Perfect Pearls™ always provide an elegant touch.
2011 02 LRoberts Exploring Image Transfers Hopes & Dreams Card

Below, you'll find a necklace featuring patterned paper by DCWV and stamps by Hero Arts®, Manuscript Background and a simple heart. (The Hearts Ink and Stamp Set. is no longer listed, but a similar stamp is available in the From the Heart set.) I'm not a jewelry maker by any means, but this is a project that anyone could complete.

2011 02 LRoberts Exploring Image Transfers Beaded Heart Necklace

Want to know more? Pull out your "inky" supplies: Inkssentials™ Gloss Paper; Archival™ Ink; Adirondack® Acrylic Paint Dabbers; Adirondack® Dye Ink Pads; Adirondack® Pigment Inks. You'll find the details on page 50 of the February 2011 issue.

June 16, 2010

By the Sea Journal and Trinket Box

"Recycle. Restyle. Reuse." It's even on the cover. Long before "going green" became the trend, crafters enjoyed the thrill of transforming what some would have seen as trash into treasure. Such was the case with this tin and matching journal found in the August 2010 issue of Crafts 'n Things. Who could guess that this textured vintage finish conceals primary paint colors. It's all in the products you use!

2010 08 LRoberts By the Sea Trinket Box
The photo images, tin trinkets, and sentiment are from the "By the Sea" plate by Oxford Impressions. For successful stamping with photo stamps, quality paper such as Inkssentials™ Gloss Paper is the key. Other supplies for this project include Adirondack® Acrylic Paint Dabbers, Tim Holtz™ Distress™ Crackle Paint™, Tim Holtz™ Distress™ Stickles, Tim Holtz™ Distress Ink Pads, and Archival™ Ink.
What could be a better compliment for a special box to store your trinkets than a journal to record your memories? This bathing beauty will keep your secrets, and the packing from my husband's shirts has found new life.

2010 08 LRoberts By the Sea Journal
The beautiful papers on the journal covers are from the All Dressed Up Stack by DCWV. In addition to the products for the tin, the journal uses Adirondack® Pigment Inks, Super Fine Detail™ Powders, and Inkssentials™ Glossy Accents™. The spiral binding coil is from one of my favorite vendors, Bonnie's Best Art Tools. (Here's a commercial: Not only does Bonnie have a great selection of specialized tools and products, she offers fabulous customer service. Just ask my husband. He loves it when my gift list has items from Bonnie's store. They're on a first name basis!)
For detailed instructions, see pages 66-67 of the August 2010 issue.

May 8, 2010

Ooh La La Fan & Card Set

Does this happen to you? Do you ever begin with a project in mind and end up in a completely different place? This is what I'm talking about.
I'm not sure why we have what I grew up calling "funeral parlor" fans in our comfortably air conditioned church. It could be that others, like me, reminisce about similar fans they used while attending church with a grandparent, or it could be this is an effective manner to deal with changing female hormones. Either way, I originally planned to create a useable hand fan. Something happened along the way, and that fan grew into the full sized wall art project below. (And by the way, I really hope that you'll purchase the magazine to see a much better image. The photographer did a beautiful job in capturing the details including the elegant black bow.)
2010 06 LRoberts Ooh La La Fan 0
I'm going to blame this change in direction on Suzanne Melvin. First, her stamps were just too beautiful for me to choose just one focal image. Next, I realized that the accompanying flourishes and borders could be used to define sectional pieces. This fan definitely reminds me of a time when such fans were a necessity and life was much slower. The beautiful images from Oxford Impressions may be found on these plates: Marie Antoinette, Le Beau Monde, and French Script.
My best description for the accompanying card is "foo foo." I love the contrast between the pink feathered lady and the elegant coach. Another beautiful French lady from Suzanne.
2010 06 LRoberts Pomp and Circumstance Card
For directions (and better pictures!) see the June 2010 issue of Crafts 'n Things. Ranger®Inkssentials™ Gloss Paper, Archival™ Ink, Tim Holtz™ Distress Ink, products used include Adirondack® Dye Ink, Adirondack® Acrylic Paint Dabber, and Claudine Hellmuth Studio Multi Medium Gloss.

ATCs – Beyond Trading: A Walk in the Garden

Looking for additional ideas that place your Artist Trading Card collection in the limelight? While the flowers in our garden were destroyed by recent rains, these projects from pages 62-63 of the June 2010 issue of Crafts 'n Things bring blooms to the forefront.
The three featured stamp sets are by Oxford Impressions: Country Girl, The Fairest Flower, and LeJardin. You will also need the following Ranger® products to recreate the ATCs : Inkssentials™ Gloss Paper, Archival™ Ink, Tim Holtz™ Distress Ink, Adirondack® Acrylic Paint Dabbers, and Posh Impressions Accent Pen™ The patterned paper is from the Wild Asparagus Collection by My Mind's Eye.
First, the elegant card. The window in the flower-shaped card provides a view of the underlying ATC, perfectly framed in gold.I know that the recipient of this card will treasure the beautiful flowers.
2010 06  LRoberts ATC Garden Card Close Up 02
Next, the flower garland. I wish that I had the photography skills (and the proper lighting in our home) so that you could view this on the door frame in my studio. While I created five blossoms to embellish the door frame, this would easily be adaptable for a fireplace or larger area.
2010 06  LRoberts ATC Garden Garland 01l
Below, the detail blossoms. I liked the look of the tulip flanking the children.
2010 06  LRoberts ATC Garden Garland 02 Left
2010 06  LRoberts ATC Garden Garland 05 Right
2010 06  LRoberts ATC Garden Garland 04 Center
2010 06  LRoberts ATC Garden Garland 03

July 5, 2009

Better Backgrounds: Irresistible Resist

Techniques have a way of morphing. I remember a demonstration of faux antiquing I saw years ago: white paint applied over a clear image embossed on black cardstock. Definitely shabby chic. Later, I learned a technique called kaleidoscope or Joseph’s Coat: black ink brayered over a clear image embossed on marker-colored cardstock, a similar process.
While experimenting recently, I believe I achieved a completely different look with Adirondack® Dye Inks, Adirondack® Acrylic Paint Dabbers, and Inkssentials™ Gloss Paper. Two cards resulting from my experiment may be found on page 95 of the August issue of Crafts 'n Things. Both feature stamps by Fred B. Mullett.
First, my "Wonderful Peppers" card. I think these pepper stamps are wonderful! I hope that you will click on the card to see the details. The Classic K Bailey Ornamental Rub-On (K & Company) is a perfect complement for this hot number!
2009 08 LRoberts BB Irresistible Resist Wonderful Peppers Rub On Card
Next, "Simply Shrimp." I'd admired the Lori’s Shrimp stamp and think that Lil’ Flying Fish is a nice partner. The rich colors of the inks provide a sharp contrast to the pastel paint. No further embellishment required!
2009 08 LRoberts BB Irresistible Resist Simply Shrimp Card
Below, two cards that you won't see in the magazine and more stamps by Fred B. Mullett.
First, "Testing the Water." I wanted to use the rather large sticker (EK Success) and that required large stamps, Blue Bobo and Big Kelp. Big stamps also mean that lots of color shows through the paint. Take a peak!
2009 08 LRoberts BB Irresistible Resist Testing the Water Sticker Card
Now, "Through the Window." I wanted to see how a transparency might work with this background and thought the Printables ERA Transparency by Prima fit the bill. It looks to me like the Mushroom and Ground Ivy are peaking through the window.
2009 08 LRoberts BB Irresistible Resist Through the Window Transparency Card
For detailed information, see page 95 of the August issue of Crafts 'n Things. With or without further adornment or with the embellishment of your choice, this resist technique is irresistible!

April 26, 2009

Rubber Stamper’s Studio: Deli Wrap Journals

Have you ever had the experience of trying to locate a supply and then forgetting why you wanted it in the first place? That was the case for me with deli wrap. I knew that I had to have some, and it took me months to locate a source. By the time that the deli wrap arrived, I was scratching my head to try to remember why I ordered it in the first place.
I now know why I started the search, but in the meantime, I've enjoyed some fun experiments. I love the translucency of the deli wrap, and I was interested to see what kind of backgrounds I could create with it. The painted backgrounds (using Adirondack® Acrylic Paint Dabbers) for these journals are the result of one of my play days. These three found their way into the June 2009 issue of Crafts ‘n Things.
5LRoberts By the Sea Deli Paper Photostamp Journal

4LRoberts Afternoon Tea Deli Paper Photostamp Journal

3LRoberts Sands of Time Deli Paper Photostamp Journal
Here are two more.
2LRoberts Invincible Summer Deli Paper Photostamp Journal

6LRoberts Remember Home Deli Paper Photostamp Journal
If you are admiring the photo stamps, they are all plates from fellow Tennessee stamper, Suzanne Melvin, and her company, Oxford Impressions. (You may remember that I used Suzanne's Bird's Nest collection in creating the birdhouse and card gift set in the April issue.) The stamps for “By the Sea” and “Afternoon Tea” are from plates of the same name. The photo stamps for “Sands of Time” and the house in “Remember” are from the Family Album plate. “Invincible Summer” uses stamps from Season of Giving.
One thing that I like about these journals is that the pages can be replaced when filled by simply untying the binding and inserting new ones. If you’re really adventuresome, collect those filled pages and bind them together for a totally new book. For details of journal construction, see pages 94-95.

March 15, 2009

Fanciful Flight Birdhouse with Card Gift Set

I was excited when I discussed this project for the April 2009 issue of Crafts ‘n Things with Dawn Gehring, managing editor. With birdhouse in hand, I envisioned stamped panels in the window openings that would match a stamped card set. When Dawn asked if the cards would fit inside the birdhouse, I remembered there had been larger houses on the top shelf at my local Hobby Lobby. With a trip back to the store, the project took on a new dimension. After removing the rope from inside the birdhouse and gluing the roof pieces together, I found that the birdhouse was a perfect repository for a 4 1/4” x 5 1/2” card set.
Now the real fun began. The patterned paper that I used, Twelfth Night from the Poetry Range by Scrapperdashery, is by my friend Judi Hodgkin. I’ve enjoyed using her papers since we met at Ranger several years ago. The stamp set, the Bird’s Nest from Oxford Impressions, is by fellow Tennessee stamper, Suzanne Melvin. Suzanne continues to amaze and inspire me with the variety of her collections and the quality of her stamps.

Here’s a “bird’s eye view” of the birdhouse:
09 04 Lynn Roberts Fanciful Flight Birdhouse Closed View 3
09 04 Lynn Roberts Fanciful Flight Birdhouse Open View 1
09 04 Lynn Roberts Fanciful Flight Birdhouse Open View 2
Now, for the cards that were featured:
09 04 Lynn Roberts Fanciful Card 1 09 04 Lynn Roberts Fanciful Card 2
09 04 Lynn Roberts Fanciful Card 3 09 04 Lynn Roberts Fanciful Card 4
The birdhouse was painted with Adirondack® Acrylic Paint Dabbers. Images were stamped with Coffee Archival™ Ink and colored with Adirondack® Dye Ink Pads. For details, see pages 56 – 57 of the April 2009 issue of Crafts ‘n Things. For eight additional cards using the same supplies, see the previous post.

Step Up Your Stamping with Foam Stamps

In the December 2008 issue of Crafts ‘n Things, I had two projects using foam stamps: the first, a tray in which a large stylized leaf and a circle stamp were turned into vibrant poinsettias, and the second, a set of holiday cards. In the April 2009 issue, you’ll find four more cards that prove that foam stamps can be sophisticated or just plain fun.
Once again, I’ve used some of my favorite supplies – Adirondack® Acrylic Paint Dabbers (and Adirondack® Metallics Acrylic Paint Dabbers,) Adirondack® Dye Ink Pads, Perfect Pearls™, and Stickles™ Glitter Glue. The foam stamp transformation is made complete with an Inkssentials™ White Opaque Pen and a black pen (Pitt Artist.) For more information on how to “Step Up Your Stamping with Foam Stamps,” check out my article on pages 78 – 79, and you too will join the glitz, glitter craze!
Lynn Roberts Foam Stamp Flowers
Lynn Roberts Foam Stamp Butterfly
Lynn Roberts Foam Stamp Bud
Lynn Roberts Foam Stamp Frog

December 12, 2008

Memory Tin Vignettes

There's no way around it. I'm in love and the mere thought awakens the senses. It's a simple pleasure, and one that is completely legal. I'm referring, of course, to caffeine. Tea and coffee. Either will do as long as it's strong. These three tins, featured on pages 88 - 89 of the February 2009 issue of Crafts 'n Things, celebrate that affection. What's more, they were so much fun to create.
I painted the tins with Adirondack® Acrylic Paint Dabbers and used Adirondack® Dye Ink Pads and Tim Holtz™ Distress Ink Pads for stamping and coloring the images. The yummy patterned papers are all from my friend Judi Hodgkin's Scrapperdashery Poetry Range. It was a special treat to incorporate stamps by fellow Tennessean Suzanne Melvin in two of the tins. (Her Afternoon Tea plate (Oxford Impressions) contains additional images in this fun theme.) Bits of broken jewelry, beads, lace, and real coffee beans complete these mini scenes.
2009 02 102 CnT LRoberts Love & Scandal Tin Inside
Afternoon Tea Stamps (Oxford Impressions)
2009 02 202 LRoberts Cafe Tin Inside
Paris Cafe Stamps: Smoochie Poochie and Post Card (Stampabilities); Street Café (Paper Candy); Romantic Swirl (B Line Designs); Manuscript Background and Old Script (Hero Arts)
2009 02 302 CnT LRoberts Coffee & Friends Tin Inside
Coffee & Friends Stamps: Cup (Art Impressions); Java/Coffee and Friends (Dawn Houser for Inkadinkado); COFFEE (Afternoon Tea from Oxford Impressions); Coffee Defined (Stampington)

October 5, 2008

A Matter of Imagination

The tray had been a fixture on our porch for years, and the once rich finish showed the effects of constant exposure to the elements. When Crafts 'n Things editor Dawn Gehring suggested a Christmas home decor project, I knew this was the perfect project to repurpose a favorite piece. You'll have to check the December 2008 issue to see the tray itself, but a few swipes of Espresso paint with an Adirondack® Acrylic Paint Dabber gave the tray new life.
I envisioned big, bold flowers and leaves. Since the poinsettia stamps that I had on hand were not the size that I wanted, I turned to large foam leaf and circle stamps to create the images that I envisioned. As with the foam stamp Christmas cards, I used Adirondack® Acrylic Paint Dabbers and Adirondack® Metallic Acrylic Paint Dabbers to mix my paints right on the stamps. I believe I achieved the bold look that I had in mind!
Lynn Roberts 01 Foam Stamp Poinsettia Tray
Now for a closer look. When I think of Christmas, I think of glitter and glitz, and the fun part of the project was adding those details. Adirondack® Dimensional Pearls, Stickles™ Glitter Glue, and Perfect Pearls™ pack a glamour punch and the Inkssentials™ White Opaque Pen adds subtle accents.
Lynn Roberts 02 Foam Stamp Poinsettia Detail

As for the glass charms, Tim Holtz™ Adirondack® Alcohol Inks and Metallic Mixatives quickly transformed jewelry findings into coordinating pieces. Rather sophisticated if I do say so.
Lynn Roberts Tray and Glass Charms
For additional details, see pages 52-53 in the December 2008 issue of Crafts 'n Things.

Foam Stamp Transformations

What comes to mind when you think of foam stamps? Simple? Plain? Country? Not any more. These three cards, featured in the December 2008 issue of Crafts 'n Things, prove that great products can change the effect from the look of a chunky stencil to one of sophistication, glamour, or just plain fun!
What could be easier than mixing colors on your stamp with Adirondack® Acrylic Paint Dabbers or Adirondack® Metallics Acrylic Paint Dabbers.
Lynn Roberts 10 Foam Stamp Angel Seeking Star
Stickles™ Glitter Glue, Liquid Pearls™, Adirondack® Dimensional Pearls, and Perfect Pearls™ can provide real pizzazz.
Lynn Roberts 20 Foam Stamp 'O Christmas Tree
I used an Inkssentials™ White Opaque and a black pen (Pitt Artist) to add detail to continue the transformation.
Lynn Roberts 30 Foam Stamp Snow Bird

No chunky stencil look here. For additional tips, see pages 88-89 in the December 2008 issue of Crafts 'n Things.

May 18, 2008

Cherish This ATC Holder

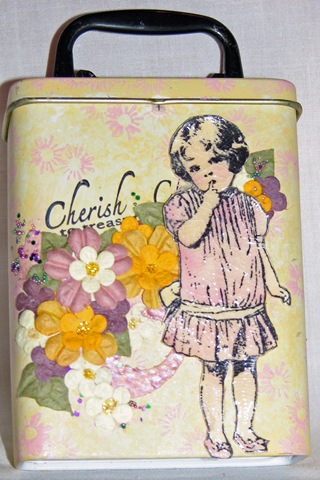
If you agreed with my "gaudy cute" assessment of the glitzy orange and purple ATC holder in the prior post, I'm sure that you'll find "Betty" one of the sweetest little girls you've ever seen. ("Betty" and the "Cherish" sentiment are both stamps by B Line Designs.) This tin was a featured ATC holder in the April 2008 issue of Crafts 'n Things.

Cherish ATCs 1
Check out the details on page 65 of how I used Adirondack Acrylic Paint Dabbers, Adirondack Dye Ink Pads, Stickles Glitter Glue, Inkssentials Crackle Accents, Perfect Pearls, and Suze Weinberg's Beadazzles to make one sweet container for your ATCs.

Storing Your ATCs with Glitz and Sparkle

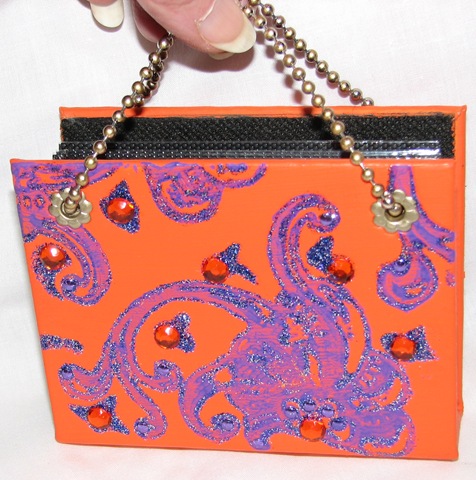
I'm afraid that my photo doesn't adequately show the details of this ATC holder. (That's my hand in the picture, and I couldn't hold the chain and get the right angle to spotlight the glitz at the same time.) When I finished this project, my evaluation was "gaudy cute." You'll find a better picture on page 65 in the April 2008 issue of Crafts 'n Things.
Purse 1
After purchasing a mini album from the dollar bin at the craft store, I realized it was the perfect size for ATC storage. All it took was Adirondack Acrylic Paint Dabbers, Swirly Element by Postmodern Design, Stickles Glitter Glue, and jewels for added bling. By adding the hibiscus eyelets and ball chain that I colored to match with Adirondack Alcohol Metallic Gold Mixative, the mini album was transformed into a little purse, the perfect size for transporting ATCs. Check out the details to make your own "gaudy cute" holder in Crafts 'n Things.

April 4, 2008

On the First Day of Christmas

I remember singing this song as a child - holding the note for "five golden rings" then singing faster and faster as I counted down to the "partridge in a pear tree." I never had a problem remembering the first five items, but I've always gotten confused with the numbers that go with maids a milkin' and lords a leapin'. When I found the "Days of Christmas" cubes by Stampington, I looked forward to creating a Christmas keepsake (2007 November Rubber Stamper) to help me keep the days straight.
From the beginning, I envisioned a monochromatic project in shades of aqua.When I saw a black plastic frame with 12 small openings at the dollar store, I knew that I'd found the perfect format.

First, I painted the frame with Ranger Adirondack Aqua Paint Dabber and edged with Stream Paint Dabber. The veins (Pool Paint Dabber) and crackle (Stream Paint Dabber) were stamped with the Stampendous Faux Finish Quad Cube. I sprayed inexpensive white bridal flowers and leaves with a Ranger Inkssentials Mini Mister filled with 1/3 Ranger Adirondack Stream Color Wash to 2/3 water.
To create the background paper for stamping, I misted watercolor paper to dampen and stamped the Stampendous Marble Texture Cube with Ranger Adirondack Aqua and Pool Ink misting to blend the colors. I then stamped the images with Ranger Adirondack Stream Ink and embossed with Ranger Super Fine Detail Clear Powder. I used my waterbrush to add color to the images misting to blend and mute the colors for a subtle effect. The center section was created in the same manner with Bring Roses (PSX) and Lace Corner (Stampabilities.) You can see the detail here.

"Love" and "gave to me" (Hero Arts Artistic Lowercase & Uppercase Alphabets) were stamped on a transparency with Ranger Big & Bossy Clear Ink and embossed with Ranger Turquoise Embossing Powder. "My" was stamped and embossed on watercolor paper then attached to an acrylic circle tag. "True" was die cut with the QuicKutz Maddie Anne alphabet and edged with a Ranger Adirondack Pigment Stream Pen.
This inexpensive project - less than $2 - is the perfect reminder of Christmas past and a carefree childhood.

Sister "Secret"

The Rubber Stamper asked me to submit several layouts for the July 2007 issue, but when I found out that only one page would be published from each designer, I asked them to use the "Secret" layout. I'm not sure what her older sister was doing - probably telling jokes or subtlely tickling, but this was one of the few photos of our younger daughter with her mouth open when she had braces. You can follow the progression of the photo shoot from the top to bottom right to explosive laughter on the left.

I created the look of mulberry paper with the Inkadinkado stamp and Ranger Adirondack Purple Twilight and Eggplant Inks. By lightly misting the inked stamp with water, the effect is a watercolor look. You may continue to mist and stamp without reinking as long as ink remains on your stamp. Then heat set. A Filigree Heart (The Artful Stamper) is stamped under the letter "e" in secret in the same way.
I stamped the Large Romantic Swirl (
B Line Designs) onto a transparency with a Purple Twilight Ranger Adirondack Acrylic Dabber, and "Secret" (Making Memories Fab Font Alphabet) was stamped with a Pitch Black Paint Dabber. The focal picture was edged with Cool Perl and Purple Twilight Paint Dabbers. Tip: Use Ranger's Inkssentials Matte Accents in attach transparencies. You only need a dot or two under the paint where it won't be noticed.

March 31, 2008

Thinking In & Out of the Box

It was hard to keep the secret. When I found out that my work was going to be on the cover of the May 2007 Rubber Stamper, I could hardly contain myself. I swore my husband to secrecy and counted the days until the magazine was out. Now that was exciting!

When I found the unpainted box at Hobby Lobby, I knew it would be the perfect home for four ATCs. I created the background paper for the “Imagine” image by collaging painted paper as described in the prior post. The rest was just pure stamping and embossing fun. Isn’t the Ranger Chinese Red Embossing Antiquities great against the black case!
The star net background is Cliff Floral by Stampington. All other images are by Paula Best: Imagine Dress, 2003 Cube Face Tags, Essential Words, and Alphabet Bricks.