Techniques have a way of morphing. I remember a demonstration of faux antiquing I saw years ago: white paint applied over a clear image embossed on black cardstock. Definitely shabby chic. Later, I learned a technique called kaleidoscope or Joseph’s Coat: black ink brayered over a clear image embossed on marker-colored cardstock, a similar process.
While experimenting recently, I believe I achieved a completely different look with Adirondack® Dye Inks, Adirondack® Acrylic Paint Dabbers, and Inkssentials™ Gloss Paper. Two cards resulting from my experiment may be found on page 95 of the August issue of Crafts 'n Things. Both feature stamps by Fred B. Mullett.
First, my "Wonderful Peppers" card. I think these pepper stamps are wonderful! I hope that you will click on the card to see the details. The Classic K Bailey Ornamental Rub-On (K & Company) is a perfect complement for this hot number!
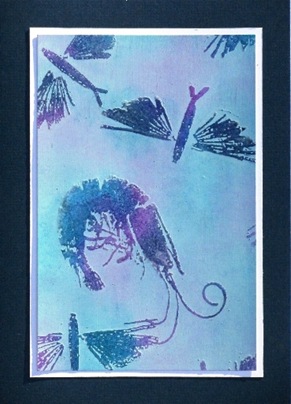
 Next, "Simply Shrimp." I'd admired the Lori’s Shrimp stamp and think that Lil’ Flying Fish is a nice partner. The rich colors of the inks provide a sharp contrast to the pastel paint. No further embellishment required!
 Below, two cards that you won't see in the magazine and more stamps by Fred B. Mullett.
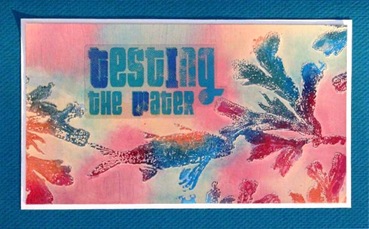
First, "Testing the Water." I wanted to use the rather large sticker (EK Success) and that required large stamps, Blue Bobo and Big Kelp. Big stamps also mean that lots of color shows through the paint. Take a peak!
Below, two cards that you won't see in the magazine and more stamps by Fred B. Mullett.
First, "Testing the Water." I wanted to use the rather large sticker (EK Success) and that required large stamps, Blue Bobo and Big Kelp. Big stamps also mean that lots of color shows through the paint. Take a peak!
 Now, "Through the Window." I wanted to see how a transparency might work with this background and thought the Printables ERA Transparency by Prima fit the bill. It looks to me like the Mushroom and Ground Ivy are peaking through the window.
 For detailed information, see page 95 of the August issue of Crafts 'n Things. With or without further adornment or with the embellishment of your choice, this resist technique is irresistible!
I might as well admit it before someone asks.
No, the "Fairyland" box and the close-up of the lid are not the same. I thought it was packed carefully, but the elephant that must have stomped on the box crushed the wings on my precious fairy. I only redid the lid, and it turned out a little differently from, my original submission. To find pictures that match, you'll need to look in the August issue of Crafts 'n Things. Here's the original box.
 Now for a closer view. Actually, I think that I like the new lid better than the first. (Next time that I go to the post office, I'll have to thank that elephant!) I never cease to be amazed at how simple charms and buttons can be used with Melt Art™ Mold-n-Pour® to form a mold for Ultra Thick Embossing Enamel™. I added highlights with Perfect Pearls™ and Stickles™ Glitter Glue.
 My second altered paper Mache creation was this "Dragonfly Delight" box. Look closely and what appear to be openings in the metal lid are actually cut-outs lined with mesh wire. Coordinating colors of Tim Holtz™ Adirondack® Alcohol Inks, Adirondack® Acrylic Paint Dabbers, and Adirondack® Pigment Inks made this a quick and easy project to finish. If you're wondering about the texture on the sides of the box, that's one of my favorite stamps, the bark stamp from the Grunge Background set by I Brake for Stamps.
 You can find complete directions for these projects on page 90 in the August issue of Crafts 'n Things.
Recently I had the opportunity to step out of my comfort zone through two mixed media workshops with DJ Pettitt. First, I would like to thank Joyce Vance for taking the time out from her very busy life to to coordinate this opportunity for all of us. Normally, my only real option for classes of this caliber has meant a day long drive to Random Arts in the Asheville area. Random Arts is definitely one of my favorite artsy places, but Birmingham is sooooo much closer. Many thanks to Joyce and her helpers for taking care of all the details to make this a fabulous experience!
The first two days were spent in a workshop entitled "Mingled Elements," a collaborate effort between DJ and Deryn Mentock. The description alone was enough to create excitement: "After creating a beautifully gilded art piece in class, we will send you home brimming with enough technique, information and inspiration to use in a wide range of artwork; from jewelry making to journals, including decorative elements that can be used in book making, assemblage, collage, altered art and everything in between!"
The first day focused on painting a face. I'm not a painter, so this was the most intense of the four days for me. DJ's focus on shapes and shadows was insightful. I don't think the world's great portrait painters need worry about competition from me, but I learned techniques and concepts that I know I will put to use in mixed media creations.
Day two was all Deryn. I found this a relaxed day. I'm neither a jewelry maker nor a wire worker, but I was enthralled with the unique framework the wire provided the portrait samples and definitely inspired by Deryn's jewelry. While I'd left a better hammer at home, I just decided to go with the one that I had and see what happened. Here's my finished creation. I was pleased with the end result and know that I have tucked away a lot of information for future use.
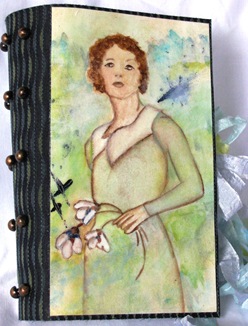
 For days three and four, we moved on to creating an altered fabric collage book. The techniques were different (and for me, less stressful than those in "Mingled Elements. I think that the smaller face had a lot to do with that. Less for me to mess up!) Take a look at the outside of my book cover.
 You can see the inside front and back below. The Battenberg lace fan had been a Christmas ornament that my mother made, a sentimental addition. I split the canvas that was originally to be the outside back cover into two pieces to create the front pocket and a decorative back strip. The flower is one that I made while playing in the wire class. I love the way the Glossy Accents make it pop.

 I'm not sure how I'm going to use my book. I got rather carried away in adding color to my pages, so they're a little bright for journaling. I'm looking forward to more fun play in the future as the book determines its purpose.
Here's one last picture that I snagged from DJ's blog. That's me concentrating on my work - head down midway on the left side at the middle table. You can probably tell by looking what a fun, inspirational group this was. Thanks to DJ, Deryn, and fellow artists for four wonderful days of escape!
I'm not sure how I'm going to use my book. I got rather carried away in adding color to my pages, so they're a little bright for journaling. I'm looking forward to more fun play in the future as the book determines its purpose.
Here's one last picture that I snagged from DJ's blog. That's me concentrating on my work - head down midway on the left side at the middle table. You can probably tell by looking what a fun, inspirational group this was. Thanks to DJ, Deryn, and fellow artists for four wonderful days of escape!


