March 31, 2008

Thinking In & Out of the Box

It was hard to keep the secret. When I found out that my work was going to be on the cover of the May 2007 Rubber Stamper, I could hardly contain myself. I swore my husband to secrecy and counted the days until the magazine was out. Now that was exciting!

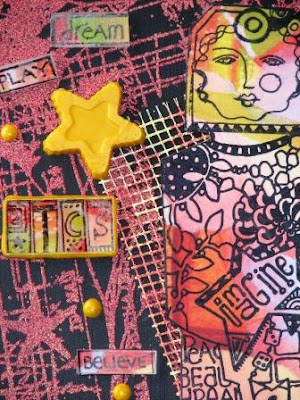
When I found the unpainted box at Hobby Lobby, I knew it would be the perfect home for four ATCs. I created the background paper for the “Imagine” image by collaging painted paper as described in the prior post. The rest was just pure stamping and embossing fun. Isn’t the Ranger Chinese Red Embossing Antiquities great against the black case!
The star net background is Cliff Floral by Stampington. All other images are by Paula Best: Imagine Dress, 2003 Cube Face Tags, Essential Words, and Alphabet Bricks.

Watercolor & Collage Grace These ATCs


I like to play with paint so making these ATCs (featured in the May 2007 Rubber Stamper) was just plain fun. For the background paper, I randomly applied Ranger Adirondack Acrylic Dabbers to dampened Japanese Masa paper leaving some white areas. I tore the painted paper and 7 Gypsies printed tissue into strips and glued them onto heavier (140-lb.) watercolor paper with matte medium. When dry, I covered the paper with a layer of matte medium for a smooth base for stamping. The Paula Best images were stamped with Ranger Jet Black Archival Ink. (Play Angel, Normal Person, Design Slice Flamingo, Be Angel, and Essential Words)

March 30, 2008

Stamped "Purse" Gift Bag

This project was published in the May 2007 Rubber Stamper as a variation of the "snazzy" found background technique. First I stamped all flowers and paisleys (Hero Arts) onto text weight paper. Next, I pounced ink over punchinella ribbon extending the ink past the edges of the ribbon to create a creased effect. Finally, I stamped my initials with LaPluma's Exiled alphabet for a personalized touch. In just a few easy steps, you can turn an inexpensive gift bag turned into a designer purse!

30 Second Backgrounds

This was one of those serendipity moments. I'd been working with Ranger's Adirondack Color Wash all afternoon. Normally, I mist my craft sheet with water and clean up by making additional background pages. After making a stack of extra backgrounds, I cleaned the craft sheet with a paper towel.

I decided to try stamping on glossy paper with the wet paper towel. The results were unbelievable. The texture of the towel and the brilliant colors transferred to paper creating a stunning background in less than 30 seconds. In January 2007, the Rubber Stamper featured these five cards using this technique. I stamped all images with Ranger Archival Ink.


I used these stamps:
  • Chocolate: Afternoon Tea by Oxford Impressions
  • Strength of a Tree: Oak Branch by Stampscapes; Strength by Custer’s Last Stamp
  • Memories Are Forever: Memories Are Forever by Limited Edition
  • Eyes for You: Shaving Mug by Artful Legacy; Eyes by 100 Proof Press; Harlequin Diamonds by Post Modern Design; Old Writing by Hero Arts; Thank You by Stampabilities
  • Forest Sunrise and Stream: Forest Sunrise and Stream, Bush, and Sedge Filler by Northwoods

Here are two additional cards that include images from Suze Weinberg Instant Art book. “SECRET” is stamped with the Postmodern Design Reverse Block Alphabet. “Live, Laugh, Love” is by American Art Stamp.


Heat set your backgrounds for the best results. You'll still be under 30 seconds. That's what I call fast!

But It Didn't Start Out That Way . . . . . Subtitle: How does frilly turn vintage?

Yesterday, I was working away on the computer when the lightening started. When you've experienced fried television sets and VCR's, it's easier to shut things down and unplug than to try to remember where the warranties are for the surge protectors.
I planned to return to the computer when the storm passed, so I didn't want to begin a major project. I decided that decorating the plain chipboard notebook I'd found earlier in the week in the dollar bin at Walgreen's would be a fun afternoon project. This is where I began.

My initial thought was to make something girly, a cute notebook for my purse. After a plain coat of gesso, I decided to add texture and depth with the next coat. An old credit card, punchinello, and plastic mesh were perfect tools.
While I was waiting for the gesso to dry, I ran across a package of beautiful embossed paper napkins that I'd purchased from Tuesday Morning at the outrageous price of $3.49 for the package of twelve. I rationalized that they were from Germany and that I might actually use the leaf embossed napkins for a special lunch. I decided to limit that future luncheon to eleven people as I pulled out one for my project.
My first thought was to add a small piece of the napkin along one side of the front, but the leaf design seemed to be absorbed by the matte medium. I realized that it would take several layers to build a base for the embossed leaves. There went all that great texture that I'd gessoed on the front.
These leaves were elegant, and I still envisioned a delicate notebook. I pulled out the new Sandy Smith owl that I'd bought earlier this week and the "to teach" stamp (Anita's) that I've always found an inspiration. I stamped the images on white tissue with Ranger Jet Black Archival Ink and layered them atop the napkins.
Although I realized that my notebook would no longer have a frilly look to it, I still envisioned an elegant style. That was before I started slobbering on the Ranger Distress Inks. I don't know how it happens. Even when I intend to create a project that is bright and cheery, my projects take a vintage turn. It's not what I intended, but what a great result. My 2/$1.00 notebook has the look of worn, expensive leather.

A couple of things that I should confess: First, I forgot to cover the vinyl-like edging when I sprayed the covers with a matte sealer. My favorite solution for a sticky surface is application of Perfect Pearls. Having used a heavy hand with the Distress Inks, I touched up the saying and the owl with a Faber-Castell Pitt pen.
Back to the title of this post. Where did I go wrong? No matter how hard I try to do cute, I usually end up in the world of grunge. I think it's just my style!

Snazzy Backgrounds

When I submitted this idea for a feature article in the October 2006 issue of the Rubber Stamper, I called the technique “found” backgrounds because I stamped the backgrounds using items I found around the house. TRS titled the article “Snazzy Background.” I don’t know how “snazzy” tub mats, shelf liners, and fly swatters are, but they are great tools for stamping.

The technique is simple with the right supplies. I created the backgrounds with Ranger Adirondack Inks and stamped the images with Ranger Jet Black Archival Ink. The key is to stamp on regular text weight paper (like the paper you use in your printer) since household items generally carry little ink.

In this first project, you can see the impression of the shell patterned tub mat. The background is filled by repeated stamping with shelf liner, my favorite and most used “found” items. (One pack at the dollar store will yield a life-time supply for you and several friends.) Isn’t the angel stamp great! The stamp and phrase are from Postmodern Design, and the rick rack border is by Hot Potatoes.


For this card, I stamped with a geometric patterned tub mat and then pounced an inked cosmetic sponge over metallic micro-dot ribbon. By turning the ribbon as I pounced, a geometric pattern was formed in some places. Check the skirt of the Tim Holtz “Pattern” stamp for this detail.

The third project published in TRS was this composition book. Interestingly, the back side was featured where I used fewer real stamps. Now you can see the front of the book. I stamped the background with a wavy tub mat, a shell tub mat, my trusty shelf liner, and a diamond patterned fly swatter. The suction cup on the underside of the tub mats leaves a circle print. (Look under the net to see the starfish repeatedly stamped in the background.) All stamps are by Oxford Impressions.


Now you can see the three cards that TRS didn’t publish. I stamped the “Life’s Blessings” card with bubble wrap, a flower fly swatter, and shelf liner before adding the images by Art Impressions.


For a different look, try tone-on-tone stamping as I did with the “Kind Words” card. In this case I added stamping with a small paint container to the shelf liner and bath mat – as before, with the suction cups forming interesting circles. The flower stamp is from Hero Arts and Mother Theresa speaks though a Wisecracks stamp. (I don’t know about you, but I find that amusing!)


This card makes me want to jump for joy. Well, at least it makes me smile. I’ve used the small paint container with a twisting motion to apply more ink – some circles with the lid on and some off. You can see bubble wrap, fly swatter, and the ever present shelf liner. The exuberant figure is by Stamp in the Hand and the saying is from Wordsworth.

When I started stamping with household items, it changed the way that I look at my environment. We are surrounded by interesting textures and shapes. I enjoy the challenge of using them.

March 29, 2008

Scrapperdashery Paper Weaving

You could count on it. When I was in elementary school, the seasons were marked by place mats woven from construction paper strips. Halloween was orange and black, Christmas was red and green, and Easter was pastel blue and pink. The sameness of weaving those paper strips was comforting. (You can be sure that I also had a potholder loom!)
My fond memories inspired me to try paper weaving with these Scrapperdashery papers. If you click on the images, you will see these projects are woven with a twist. The strips that I used for weaving are straight, but the base mats were cut in waves. Using a different part of the patterned paper to weave through these waves gives a childhood technique a sophisticated flair.
I don't know about you, but I always find it a challenge to create "manly" projects. I think this notebook fits the bill. I painted the edges and back with Ranger's Adirondack Acrylic Dabbers for a finished look, added a woven paper section to the top, and stamped the Paper Artsy image with Jet Black Ranger Archival Ink on the bottom. Notice how the use of the darker strip in the top helps to add focus and balance to the piece.


It's always easier for me to create feminine projects. First, I covered the entire mini clipboard with Scrapperdashery paper adding color to the sides with a coordinating Ranger Adirondack Acrylic Dabber. A paper weaving section, chipboard paper covered flower with inked edges, and ribbon for foo-foo. I stamped "mom" on a piece of scrap paper and attached the acrylic tag to the paper. Any mom would love this!

A simple paper mache box becomes a treasure when a little paint and this woven sentiment. First, I painted the box with Ranger Adirondack Acrylic Dabbers. I created the fun circles with two Dabbers by using less pressure to stamp the second circle on top of the larger one. In this case, I cut wavy lines into the base paper itself rather than adhering a woven piece to my project. I purposely left the woven strips untrimmed to tie the sentiment to the box.

Two more projects below. The father card shows the subtle approach while the mother card is more distinctive. Any way you look at it, this is fun!

Scrapperdashery Color

Yesterday, my work had a vintage feel - so easy to accomplish with Scapperdashery papers. Today, I want to show how those same papers can be used for updated playful projects.
I love this little "purse" notebook, a dollar store find. Simply ink the edges of the patterned paper with your favorite Ranger Distress Ink, and your background is complete. I added black ribbon to the "handle" for a little punch. The flower and dragonfy images were made by stamping Ranger's Jet Black Archival Ink on shrink plastic with a light application of Perfect Pearls for a punch of color. Done!


Here's another project where I stamped directly on Scrapperdashery patterned paper. I added black ric rac and the letters and arrow (QuicKutz) to this fun Paula Best image, and my project was complete. Now, just because you have a cute little recipe tin, it doesn't mean that you have to cook!

The picture that I was working with was definitely lacking, so I decided to color the dress with Ranger's Distress Ink. I stenciled "BABY" onto the paper and added a few other finds from my scrap basket. I'm keeping this project in mind for the next time that I want to create a personalized baby gift.

March 28, 2008

Scrapperdashery "I Hope"


Here's that same picture of my grandmother in a scrapbook layout. The beautiful colors of the Scrapperdashery Poetry range are great for vintage photos. And yes, that's just corrugated cardboard with the top layer gently removed. (Click on the title to see the depth that the paint adds to the cardboard.) The "hope" stamp is by Wordsworth.

Scrapperdashery "1918" Bessie

Chipboard scraps provided a great base for this piece featuring my grandmother. Add a few stamps to Scrapperdashery paper and it's done!

Scrapperdashery Artist Journal

I love to stamp on patterned paper. Doesn't this Paper Artsy filmstrip stamp look mysterious? I think the Tim Holtz Artist stamp provides the perfect touch.

Scrapperdashery "Be Yourself" Notebook

I had such fun creating with Scrapperdashery papers. The clownlike image of this TIm Holtz little girl stamp adds a playful touch.