Who hasn’t heard of the edgy English stamp company Paper Artsy. It’s hard for me to believe that it’s been almost five years since I first met Leandra Franich at CHA. The next year she would return as an exhibitor, and the stamping world has not been the same since.
Leandra was also a fellow “graduate” of Ranger University. In a weekend that was a whir of tips and techniques, I was fascinated with Leandra’s work and her use of Ranger products.
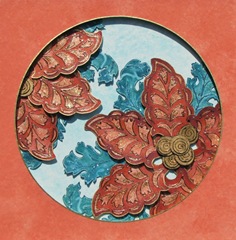
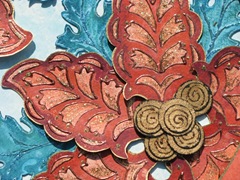
You may be wondering about the connection between Paper Artsy and the title of this post. When I began to consider projects for the February 2009 issue of Crafts ‘n Things, I wanted to create sophisticated non-traditional Valentines. Leandra’s Penny Plates came to mind and the results are below. No lace or frills here, but I think my Valentine will definitely “think happy thoughts” when he sees this!
 I’m sure that my dear one will be also be interested in the “Bank of True Love.” Hugs and kisses are bound to result from the X’s and O’s on this card! (Stamps: Love Collage - Tim Holtz™ Collection, Stampers Anonymous page 146); Harlequin Diamonds - Postmodern Design) Check the February issue, pages 68 – 69, for detailed instructions for both these cards.
 The cards below also use the Melting Pot®, Melt Art™ UTEE Brightz™ Fuchsia, and Melt Art™ UTEE Flex™. You’ll find complete directions for them at Crafts ‘n Things as well as tips for using your Melting Pot®. (If you have not joined the Crafts 'n Things community, you'll find access to bonus projects and lots of "free stuff" by simply providing your email address. Sign up and get ready for hours of exploration!)
 Stamp (Hero Arts): Fancy Love
 Stamps (Tim Holtz™ Collection, Stampers Anonymous): True Friendship, Scribble Heart
One of the things that I always looked forward to in The Rubber Stamper was the annual ink chart. I was pleasantly surprised when thumbing through the December 2008 issue to find that Crafts 'n Things has continued that wonderful tradition. Is your ink water resistant, acid free, or fade resistance? Can you emboss? Matte, glossy, vellum, acetate, shrink plastic, wood, metal, polymer clay, porous, non-porous, fabric, leather, plastic - can you stamp on it? What about clean up? Check out pages 92 - 97 for a chart that summarizes these details for all your favorite Ranger products. How much more convenient can it get!
The tray had been a fixture on our porch for years, and the once rich finish showed the effects of constant exposure to the elements. When Crafts 'n Things editor Dawn Gehring suggested a Christmas home decor project, I knew this was the perfect project to repurpose a favorite piece. You'll have to check the December 2008 issue to see the tray itself, but a few swipes of Espresso paint with an Adirondack® Acrylic Paint Dabber gave the tray new life.
I envisioned big, bold flowers and leaves. Since the poinsettia stamps that I had on hand were not the size that I wanted, I turned to large foam leaf and circle stamps to create the images that I envisioned. As with the foam stamp Christmas cards, I used Adirondack® Acrylic Paint Dabbers and Adirondack® Metallic Acrylic Paint Dabbers to mix my paints right on the stamps. I believe I achieved the bold look that I had in mind!
 Now for a closer look. When I think of Christmas, I think of glitter and glitz, and the fun part of the project was adding those details. Adirondack® Dimensional Pearls, Stickles™ Glitter Glue, and Perfect Pearls™ pack a glamour punch and the Inkssentials™ White Opaque Pen adds subtle accents.
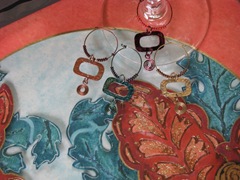
 As for the glass charms, Tim Holtz™ Adirondack® Alcohol Inks and Metallic Mixatives quickly transformed jewelry findings into coordinating pieces. Rather sophisticated if I do say so.
 For additional details, see pages 52-53 in the December 2008 issue of Crafts 'n Things.
You may have noticed there is no longer a RSS FWD link to subscribe to my blog. The explanation is simple: After the recent RSS FWD upgrade, my subscription link no longer functioned, and I could not find information to upgrade. While you may still add my URL as an RSS FWD feed here and continue to receive RSS FWD blog updates, I decided it was time to provide the FeedBurner option. Personally, my RSS FWD results continue to be inconsistent, and I'm ready to try something different.
I feel like a little girl who's been waiting for Santa for a long time and his arrival is imminent. Earlier this week, I noticed that the home page for Crafts 'n Things now features the December issue of the magazine. That means that my copy of the magazine should arrive any day. (One of the advantages of a subscription: having your copy in hand before it's on the newsstand!)
I never tire of looking through holiday idea books. Although I primarily consider myself a paper crafter, there is inspiration to be found everywhere. Just look at this cover and you'll see what I mean.
 I must admit that there is another reason that I'm excited. I can't wait to see my Christmas projects in print. Although I've had projects published in several issues now (since Amos Publishing acquired The Rubber Stamper,) these are the first that I designed specifically for Crafts 'n Things.
Have you seen the mail carrier?
I must admit that there is another reason that I'm excited. I can't wait to see my Christmas projects in print. Although I've had projects published in several issues now (since Amos Publishing acquired The Rubber Stamper,) these are the first that I designed specifically for Crafts 'n Things.
Have you seen the mail carrier?
I like to make books but rarely use them. Generally for me, it's the process rather than the outcome, so this is a change: a project I'm really using. I've been looking forward to its publication in the August 2008 issue of Crafts 'n Things so that I could share detailed pictures.
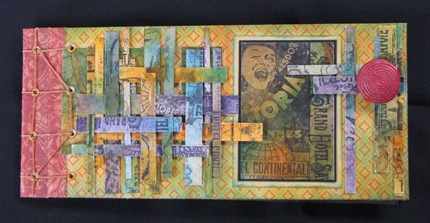 With patterned paper as a foundation for the cover (Bo-Bunny Press Shabby Princess Collection,) take a closer look at this twist on a traditional book binding technique.
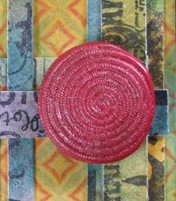
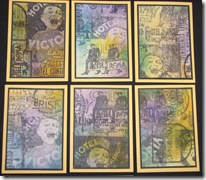
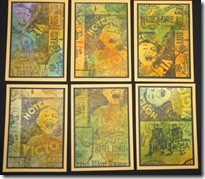
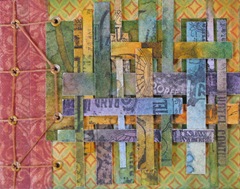 The ATCs on the cover and inside used one stamp, the Tim Holtz Hotel Collage (Stampers Anonymous.) Of course, I used some of my favorite Ranger products: Adirondack® Color Wash™, Tim Holtz™ Distress Ink Pads, and Archival™ Ink. I used Melt Art™ Mold n' Pour™, my Melting Pot®, Melt Art™ UTEE Brightz™, and Perfect Pearls™ to create the fuchsia embellishment. I think this is the perfect touch.
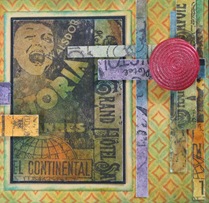
 Inside the book, you'll find a dozen ATCs made with the same stamp. (I find it a challenge to navigate the Stampers Anonymous catalog. Check out page 9 in the Winter 2008 Supplement 8.2 to see how versatile the image is.)
 For detailed instructions, check out the August 2008 issue of Crafts 'n Things.
Look what I made!
 After two days of workshops at Random Arts with Katie Kendrick, my husband asked how many times I'd drawn faces in the past. If you don't count adding a smiley face to a stick figure, the answer to that would be never! Needless to say, this was a weekend that pushed me completely out of my comfort zone.
When I first saw Katie's whimsical dolls in the Winter 2006 issue of Cloth Paper Scissors, I was intrigued. The dolls just smacked of personality, a factor that I would learn came straight from the heart of their maker. And now, Katie was coming to Random Arts to teach.
The first workshop was listed as a mixed media wall hanging. I've done some quilting in the past, so a "no experience necessary" project to reflect on the my "quirky side" sounded like fun. (More on this later after I finish my quilt.)
The second workshop was described as "freestyle intuitive doll making" without fussy cutting or fussy seaming. I couldn't wait to find out how to use simple pattern pieces to design a doll body and completely ignored the mention of learning to "paint an original face on my creation." After all, Katie was going to provide a face for us to use if we wanted to. Although I'd packed paints and other supplies, I never thought about this again until after class began.
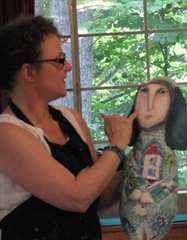
Katie is a self-taught artist unspoiled by the rules of a formal education. As she described her journey into art and her path to creativity, we were inspired to see where our hearts would lead our paint brushes. (The group included several professionally trained artists with others who like me had never attempted more than stick figure art.) We drew faces with our non-dominant hand, laughed, and followed her instructions for transferring our work to muslin. After learning how to create flesh tones, the work began in earnest. Katie was there to encourage and guide, seeking to provide input and assistance. Here are pictures of Katie, one of her dolls, and the face that she painted while we watched.
After two days of workshops at Random Arts with Katie Kendrick, my husband asked how many times I'd drawn faces in the past. If you don't count adding a smiley face to a stick figure, the answer to that would be never! Needless to say, this was a weekend that pushed me completely out of my comfort zone.
When I first saw Katie's whimsical dolls in the Winter 2006 issue of Cloth Paper Scissors, I was intrigued. The dolls just smacked of personality, a factor that I would learn came straight from the heart of their maker. And now, Katie was coming to Random Arts to teach.
The first workshop was listed as a mixed media wall hanging. I've done some quilting in the past, so a "no experience necessary" project to reflect on the my "quirky side" sounded like fun. (More on this later after I finish my quilt.)
The second workshop was described as "freestyle intuitive doll making" without fussy cutting or fussy seaming. I couldn't wait to find out how to use simple pattern pieces to design a doll body and completely ignored the mention of learning to "paint an original face on my creation." After all, Katie was going to provide a face for us to use if we wanted to. Although I'd packed paints and other supplies, I never thought about this again until after class began.
Katie is a self-taught artist unspoiled by the rules of a formal education. As she described her journey into art and her path to creativity, we were inspired to see where our hearts would lead our paint brushes. (The group included several professionally trained artists with others who like me had never attempted more than stick figure art.) We drew faces with our non-dominant hand, laughed, and followed her instructions for transferring our work to muslin. After learning how to create flesh tones, the work began in earnest. Katie was there to encourage and guide, seeking to provide input and assistance. Here are pictures of Katie, one of her dolls, and the face that she painted while we watched.
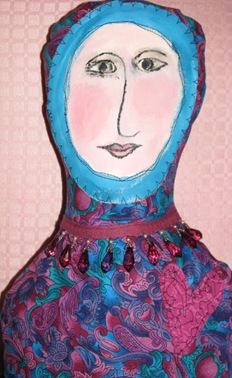
 You would never have believed that this was a group of novices. Each doll had a distinctive personality; many were intricately pieced. Although I had brought along a box crammed full of fabric, after framing my doll's face with Turquoise Phthalo, I knew that the beaded trim and appliquéd heart were all that needed to be added to this beautiful fabric from my mother's quilting stash. Whether or not my doll appeals to anyone else, I now have a sentimental treasure. Beyond that, I enjoyed a challenging weekend. If only I lived closer to Saluda!
When I mentioned my visit to Random Arts earlier this spring, I was generally met with a quizzical expression. It's difficult to explain why it is truly "worth it" to spend the time and gas for a trip to Saluda, North Carolina. Granted, this spring our vacation to nearby Asheville brought us to the area, but last week end I made the journey just to take classes. My spring pictures highlighted the outside of the shop and the quaintness of the area. This trip, we'll look inside.
 When you walk into the Random Arts, this is the view to your right. I think the title of this post says it all: sensory overload. In addition to the stamps you find displayed throughout the store, there are treasures tucked into every nook and cranny. Don't miss the collage bags in the lower right hand corner of this photo - color coordinated offerings: ribbons, buttons, and tidbits for the multi media artist, stamper, or scrapbooker looking for that perfect embellishment. The fabric hanging below the bags is simply luscious. In the bottom left, you'll find magical solutions to transform mesh or metals and samples to stimulate experimentation. It will be difficult to move on, but there is more to be seen.
 The picture above should give you an idea of why it's easy to spend an afternoon in this relatively small shop. I couldn't resist looking in every drawer and browsing through the related books. The displays will allure you to try something new.
 Looking for inspiration? Above, the walls provide an endless bounty of ideas to touch and explore. Jane Powell and her staff are knowledgeable and more than willing to share their expertise. Below, the cash wrap is almost buried under product and samples. I've never resisted adding something to my purchase while checking out. This time, it was newly arrived bird charms.
 If this sounds like a commercial for Random Arts, I can't help it. Friends share their favorite places with friends. I just wish I lived a little closer!
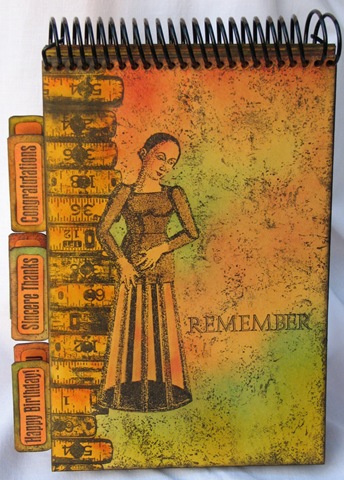
Whenever I looked at the Santos Doll stamp, this saying kept going through my head. I finally realized that it was from the cover of the autograph book that I had as a child. Remembering is important. This card holder can provide a perfect place for you to store the cards that you plan to send or those you receive for special occasions, a way to help you "remember."
You'll find the details of how I used Adirondack Dye Ink Pads to transform readily available Kraft envelops on page 80 of the June 2008 issue of Crafts 'n Things. The Exiled Occasion Phrases were the perfect stamps for my dividers. If you don't own a binding system - I used my RubiCoil, use your imagination to bind your own special place for remembrances.
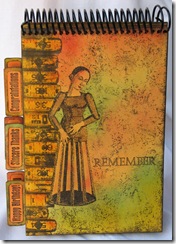 Stamps: Santos Doll by Invoke Arts, Wooden Ruler Design by Postmodern Design, Remember by Stampa Rosa, Artista Quad by Stampendous, and Exiled Occasion Phrases by La Pluma
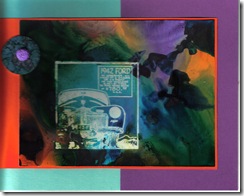
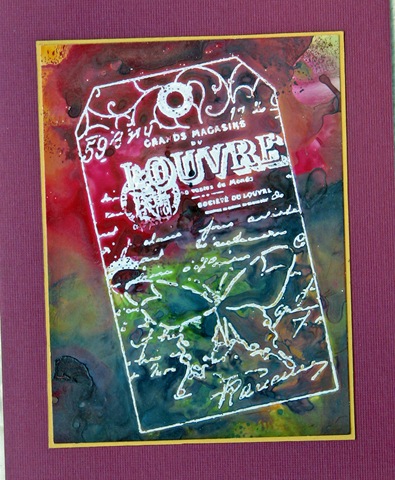
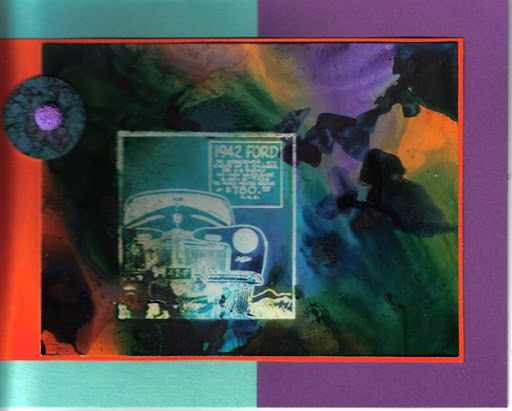
Encaustic painting has long held a fascination for me. When I discovered how to emulate this effect with Adirondack Color Wash, I was thrilled. You'll find detailed instructions for these cards in the June 2008 issue of Crafts 'n Things. You'll be amazed at how easy it is to get fabulous results.
 Stamps: Car Cube 1942 Ford by B Line Designs; Societe du Louvre by Just for Fun